If there is one thing that became evident being stuck at home 24/7 during the pandemic, it was that I needed to find ways to keep my brain busy and keep life interesting. There are only so many TV shows one can watch and yes – I will admit I need to do more reading, but I also needed to do something with my hands. So, I began toying around with robotics, an interest I’ve had most of my life.
I pretty quickly discovered that the most effective way to build my robots would not be with carved wood and cardboard (though that could be interesting), but by using a 3D printer.
I spent weeks researching every aspect of 3D printing, trying to understand how they worked, what the different resolutions were, filament vs. resin, different plastic types. I almost bought a resin printer that seemed like a good fit, but it didn’t have a very large print area and I knew I wanted the ability to print larger prints. I also wanted something that was economical and wouldn’t cost me an arm and a leg but still could put out good quality prints.
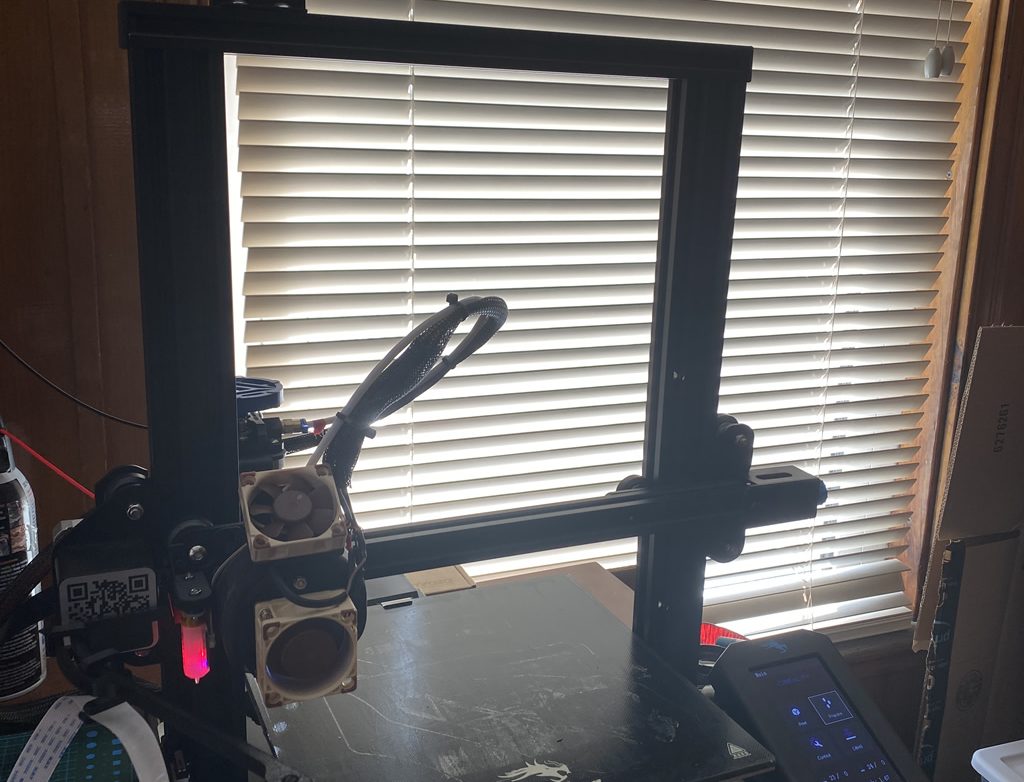
I finally settled on purchasing the Ender 3 v2 by Creality. The v2 had the same great design as the original Ender 3, but it had the built-in newer Mean Well power supply (PSU) that a lot of the Ender 3 users were upgrading to. It also had a 32-bit board rather than the original 8-bit board. To top all of this, it has the capability for great resolution (~0.1 mm).
Side note, this is a fantastic video that shows how to set up the Ender 3 v2 from start to finish.
Now, the great thing about the Creality 3D printers is that they are open source which means you can buy or create a ton of addons for them. To clarify, this is not why I bought the Ender 3 v2, I honestly had no idea that you could add on to it so much when I bought it. However, I quickly found out that there were some things that were driving me crazy, such as my printouts not sticking to the bed or constantly having to level the bed. So, over the last few months, I have found that there were a lot of needed (and some not – so needed) upgrades that I have chosen to do to my Ender. (be sure to also check out the software changes I have made – at the bottom of the article)
Important Tips I Learned Quickly
- Preheat the bed before bed leveling. Metal, glass, etc. – they all expand when heated. So the distance between your bed and your hotend are going to be slightly different when it’s hot vs. when it’s cool.
- Level the bed by using a post-it note. Slip the post-it note between the hotend and the glass bed at each corner. Adjust the leveling knob so that there is just a little friction on the paper. Do this for all four corners at least twice. (yes, you can use the same post-it note the whole time 😉 )
- A better spool roller is a must. Creality ships this tube (yes, it’s literally a tube) that the spool sits on. So as the filament is pulled off it, the spool does this herky-jerky movement which can cause stress on the filament feeder. I have details on how to deal with this further down the article.
- Cleanliness is next to godliness. Keep that bed clean! My personal advise, wait for the glass to cool, then take it off and wash it at the sink with dishsoap and water, then dry it well. Never try and clean it hot, glass shatters under rapid expansion or contraction – even tempered glass like this.
- Use Magigoo. You’ll see more on this below, but I’ve tried everything to get my printouts to stick well to the surface. Cleaning, painters tape, you name it. Magigoo is by far the miracle worker. It’s not cheap ($16 USD a bottle), but it lasts a LONG time and it’s worth it.
Some of the things that quickly irritated me:
- Too Noisy – The printer sits in my office where I work every day. The original fans were ridiculously loud when you’re on a zoom call.
- Constantly leveling the bed – This drove me crazy pretty quick. I realized that the prints were either not adhering or I was getting spaghetti’s (where the print slides out of place or the bed is too far away from the head and filament spews out with nothing to stick to).
- Having to constantly keep an eye on the printer – At first, I took an old webcam that had an onboard interface I could connect to with a browser. Worked, but wasn’t really very effective in knowing what is going on with the printer.
Physical Modifications of My Ender 3 v2
So here are the modifications I made to my printer and hopefully (if you’re a 3D printer enthusiast or soon to be) these mods can help you!
NOTE: I am not responsible for any modifications you make to your printer and I highly recommend you do your research first and carefully make sure you are always insulating your wires and boards and that you solder your connections well. Improperly connecting electronics can result in a fire or damage to people or property. All of these modifications you make at your own risk.
- New quieter fans – This made an enormous difference to the peace in my office. However, you can’t just buy new fans that fit into the existing print head because all the fans on the market that are that small are far too loud. I wanted to also make sure I wasn’t going to sacrifice airflow, quality, or worse, risk my printer overheating and causing a fire hazard. So I decided on the Noctua fans. They were highly recommended on multiple sites and there were some mods on Thingiverse that allowed for the upgraded fans (which basically involved me rebuilding the hot head cooling. It sounds laborious, but it really was not difficult.
Here is what I used:- Print out the parts from Thingiverse for the PET Fang Cooler (for the record, I used standard PLA and not PET and have had no problems with the fang melting or anything).
- 3 Noctua fans – (2 – 40X10mm and 1 – 40X20mm) The 10mm fans are used for the CPU mainboard and the print cooler. The 20mm fan is for the hotend.
- Pack of 5 Buck Converters – These convert the voltage from the 24v of the power supply down to the 5 or 12 v needed. It’s very important to use good quality buck converters that you know can handle the amps (current). I used these because they were so small I didn’t have to add them inside the motherboard area, I could literally tie them in inside the flex tubing that goes to the fan.
-
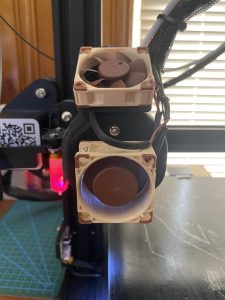
My modified print head
BLTouch & New Springs – Two things tremendously helped with keeping my board level and not requiring me to constantly level it before each print. I still need to level it every few weeks (at least I do it, just to be safe), but I no longer have to with every single print. I added a BLTouch. This little device has a pin that automatically checks multiple points on the bed before it prints every time. It then automatically does the math of the z-index at each of those points, so that it creates a “virtually level” bed that it’s working on. By the way, this video by Dr. Vox was extremely helpful in installing the BLTouch.
Here is what I used:- For the BLTouch:
- Print out this bracket from Thingiverse – which goes with the above PET Fang Cooler.
- Purchase a BLtouch – there are quite a few knockoffs, so use this one – the original. It comes with everything you need except the Fang bracket
- Springs – now, part of the problem with constant leveling is that Creality uses a cheap spring on the beds. It doesn’t provide enough compression, so you need stronger springs to strengthen the holding position. (see this video).
- These are the springs I bought and installed.
- For the BLTouch:
- OctoPrint – As nice as my webcam was, it didn’t actually let me monitor everything that was going on in my printer (temp, etc.). So I found this great little idea called Octoprint. You basically build out a small RaspberryPi computer that connects to your printer, monitors it, lets you see it, you can even stage print jobs. Here’s what I followed to build and install it all. One little downside is that you need your print job illuminated. See below and you’ll see the LED panel I used for that.
Here is what I used:- For OctoPrint:
- Print out this RaspberryPi case (it mounts to your printer)
- Print out this boom and camera mount (also mounts to your printer)
- Parts needed to purchase:
- A RaspberryPi computer board – I’m recommending this one (Pi 2 B) because it doesn’t generate much heat and you don’t need the cooling fan
- An SD card for the RaspberryPi OS
- A micro USB cable to connect to the printer
- A camera for the RaspberryPi
- Setup OctoPrint
- Print up LED Panel from Thingiverse
NOTE: I already had some LED strip hanging around, but you can buy them pretty cheap here. - Now, if you’re like me – you don’t like a lot of extra power cords running around. So you can also build out a direct tie-in for power using this guide and this case on Thingiverse and this buck converter.
- For OctoPrint:
- Print Spool with bearings – I wasn’t particularly happy with the simple “pipe” that Creality ships with their printer to hang a print spool on. It’s sort of jittery in the output on the filament and I felt it kept tensioning up the feeder too much. So I wanted something that would allow better flow. I printed this little guy out from Thingiverse and it made a world of difference.
Here is what I used:- Print up the Filament Holder from Thingiverse
- Purchase these bearings
-

MagiGoo
Magigoo – Magigoo was something that Dr. Vax mentioned in his video above. The stuff is AWESOME, especially with the Ender 3 v2 glass bed. A little forewarning, things can stick a little TOO well, so sometimes you need to just let your bed cool down a little first and then things pop off it. It washes off very easily and is safe for the bed. You can buy it here.
Once all this is done, I still have not yet gotten to the PSU (Powersupply) fan upgrade. This is a whole other ball of wax (or plastic). Because the PSU will not fit the fans I listed above and frankly, they don’t really move enough air anyway for PSU. So, to do this you’ll need to print out a new bezel and get a larger fan. I’m currently in the process of this and will post my outcome on this afterward.
Software Changes
How you set your settings can have a profound impact on the quality of your prints, I have found. Here are some changes I made to my Cura Utilimaker (the software Creality recommends using. It’s free.) Note that all of these you can “search” for in the Print Settings window.
- Make sure the “Layer Height” is set to 0.18mm
- Set the “Wall Thickness” for the Shell to 1.2mm
- Set the “Wall Line Count” to 2
- Set the “Infill Density” to 35%
- Set the “Infill Layer Thickness” to 0.36mm -this should be double the layer height. It prints larger lines for the infill, but only prints infill every other line but retains high quality for the outer shell
- If printing PLA, print it at 210°C and 60°C for the bed temp (this helps with layer adhesion) – The higher temp is on purpose, for the infill you are printing thicker lines and running at a higher speed, so you want the PLA to come out smoothly.
- For prints that you aren’t overly concerned with aesthetics (such as mods to your printer) – Set the “Print Speed” to 110 mm/s
- For prints that you want the best look possible – Set the “Print Speed” to 50-60mm/s (75mm/s is a nice middle ground)
- Set the “Retraction Distance” in Travel to 5mm (this helps to prevent artifacts and webs from showing on the print jobs)
- Set the “Z Hop When Retracted” in Travel to Checked (this helps to prevent artifacts and webs from showing on the print jobs)
- Set “Combing Mode” to “All” – This keeps the nozzle only within printing areas when traveling, thus preventing (or reducing) the web threading that can occur between models.
- IF you’re using supports (for overhead pieces) then use “Tree”, “Touching Buildplate”, Support pattern “Zig Zag”, and set the overhang to 53°


 Saturday Morning Cartoons: In an age of Netflix, YouTube and Amazon Prime, today’s children will never know what it was like to have to “wait” until Saturday morning when you could finally watch what you wanted to watch (and adults had to endure the onslaught of children’s programming and commercials for toys galore). We all had our favorites such as
  The Pet Rock: You can call Gary Ross Dahl crazy for inventing The Pet Rock, but you gotta give it to the guy, anyone who can come up with an idea of grabbing a bunch of rocks our of his back yard and get people to buy it can’t be that crazy given that he made $1.4 million on his short lived venture. Anyone want to buy a Blade of Grass for $1.50? I’ve got a couple million I’ll sell you!
 The Pay Phone: “Here’s a quarter, call someone who cares.” You’re going to be late; you can’t find their house; you need to call home; you want some privacy from the house phone? No problem… use the payphone. A staple at almost every street corner up until the 1990s, the payphone was the best way to reach out and talk to someone. Once cell phones became mainstream, we no longer had a use for them.
 The Atari 2600: I wanted one starting around the age of 5 (I guess that dates me) and loved the idea of not having to go to an arcade to play a video game… but to actually be at home to play! Ted Dabney and Nolan Bushnell developed the Atari gaming system in the 1970s. Originally operating under the name “Syzygy”, Bushnell and Dabney changed the name of their company to “Atari” in 1972. Some of the more popular games for the system were
  The Game Boy: Another product in the video game market. It was a handheld game console which was developed and manufactured by Nintendo and first released in the 100th anniversary of Nintendo in Japan on April 21, 1989. It shipped with Tetris as an included game, but you had to buy additional games if you wanted to play others. During its early lifetime, the Game Boy mainly competed with Sega’s Game Gear, Atari’s Lynx, and NEC’s TurboExpress. The Game Boy outsold its rivals and became a significant success.
 Atlas: Atlases and road maps are rapidly disappearing with the GPS and the mapping technologies built into phones and tablets. Most of the time you don’t even need to enter an address in, you simply ask Google or Siri how to get somewhere and it automatically routes you. I challenge our youth to get us to the next state without an electronic device. Could they do it?
 technology. To much of the world (yes they served not just USA), America Online (AOL) was one of the early pioneers offering home users the ability to connect to (what they believed was) the internet. I say it’s a joke, because the reality is, although you could browse the websites using america online – you were actually secluded most of the time to their private network which was based in Virginia. Their spin-off messaging application: AOL instant Messenger (AIM) was hugely popular from 1997 until around 2005.

 We can pay more attention to our God given soul to communicate with our fellow man and woman. If we were intended to communicate with those around us instantly, we would have been given antenna and telepathy.
 The automated woman on the other end states “I think you said your having problems with your service, is that correct?”
 he Cons
 I have an iPhone and frequently use an App called TeleNav. Pretty cool little program that allows you to use your phone as a normal GPS that you would have on your dash. I started using it a months ago and enjoy the ease of use and the convenience of always having it with me. That was until I noticed that there is no way to turn off the audio. On a phone call, listening to music, anytime, the stupid thing is always trying to give me play by play directions to the next turn. I finally uninstalled the thing because it was worthless to me if there was no way to shut off the audio. Another perfect example of technology trying to be too smart.
 One of my personal pet peeves of a lot of newer cars is the auto lock feature. As soon as you engage Drive and start moving, the doors lock. I don’t want the doors locked unless I want them locked. I have this (perhaps irrational fear) of getting into a car accident, being unconscious and my doors being locked, thus making it impossible for someone to pull myself or my children out of the car. Very dangerous thing, I feel – also extremely irritating if you pull forward, realize you forgot something and need to jump out for a second.
 I cannot attest to this annoyance myself, but my father – who is a farmer, brought this to my attention. A lot of the newer tractors have GPS guidance systems in them where you can setup a field in the computer, then press auto-drive and the tractor will plant a field (or harvest it) with extreme precision. However, one of the well known irritations is that the tractor tends to pull up on the planter (lift it out of the ground) before it reaches the end of the row. Those of us who are not farmers may say “so? what’s the big deal?”. Well, it can mean having thousands of dollars of crops not planted because you end up missing the end of the row by 5-15 feet on hundreds or thousands of rows.